Open topic with navigation
Step 7a – Collect data
Note: if the options to create a new patient/session are not shown, select View > Project View.
Proceed to step 7b if you want to import existing files.
- Begin the capture by collecting a static trial. Ask the subject stand in the middle of the field of view.
- Elbows bent approximately 90° as if holding ski poles or riding a motorcycle.
- Legs approximately shoulder-width apart.
- Feet flat on the floor. If a patient cannot place their feet flat on the floor, be sure to un-check the option "Left/right foot normalised to static trial" (see “Step 5 – Subject and Session details”
- If you want to see kinetics data for static trial in web report, make sure to zero force plates before capturing the static trial. Stand on the force plates, with one foot on each force plate.
-
Click on the red box for the static file and select Capture to begin capturing.
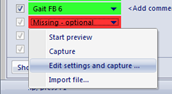
Note: if you want to change the duration of the recording, select Edit settings and capture instead. QTM will remember the time you enter and will use it for all future trials you are recording for the measurement type within this project.
- Review the capture to ensure all markers are present. The subject must be completely static. If required, crop the file to a section in which the subject was static and all markers were visible.
- Remove 'static only' markers.
- Before continuing to dynamic trials, zero the force plates.
- After zeroing the force plates, continue by recording the gait trials. Repeating steps 2. and 3 for each trial. When using force plates, files should start approximately one step before the first force plates and end 2.5-3 steps after the last force plate.
- Should the AIM fail to identify all markers, label manually and add the file to the AIM model. See the QTM manual for details. It is recommended that you have one ‘master’ AIM model for all subjects and keep adding trials from different subjects to that model if the model does not identify all markers correctly. For AIM file used please refer to here:
-
Check that all markers are present and labeled correctly.
- When using the CGM2 session type, mark any invalid force plate contacts as follows:
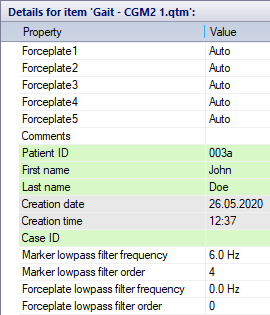
- Lowpass filter can be applied to marker data and to analog data. For CAST, IOR, CGM and Markerless session, the filter is applied globally (for all patients). To change the filter, navigate to [your project]\Templates\settings.php and adjust the parameters under the Filtering section for CAST, IOR and CGM or under the TheiaTools section for Markerless. For CGM2 session type, the lowpass filter is set individually for each dynamic measurement. Modify it by right-clicking the measurement in the Project data tree and select "Edit fields" and specify filtering parameters (see picture above).
-
Proceed with Step 8.
Step 7b – Import existing files
-
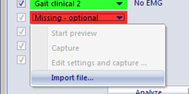
If you want to process existing QTM files (that you recorded outside analysis module), click on the red box for the corresponding file and select Import file.
The files will be copied into the session folder and renamed to a standard name. Use the comments field if you want to make a note of the original file name.
-
Repeat for all required files. Check if files are labeled correctly and crop if needed. If you need to label the files with AIM, see Step 7a and the QTM User Manual for details.